How to Fix Battlefield 6 Game Crashes
The highly anticipated Battlefield 6 has arrived, bringing more realistic battlefields, superior graphics, and richer content, making every match with dozens of players even more intense and thrilling. Many players in the beta test praised the game's excellent optimization, stating that even mid-range PCs can run it smoothly. However, numerous players have also reported issues like game crashes and sudden exits. So today, we'll explore the reasons behind Battlefield 6 crashes and possible solutions.

Why Does Battlefield 6 Keep Crashing?
Typically, Battlefield 6 crashes can occur either during game startup or mid-match, with no fixed pattern. Even if your previous session crashed only after entering a match, the next crash might happen during startup. Most of the time, there are no error messages—the game simply closes automatically, returning you to the desktop. Based on player feedback, we've identified the following potential causes for Battlefield 6 crashes:
- Insufficient Virtual Memory Allocation - Battlefield 6 exhibits continuous memory accumulation without automatic release, eventually causing crashes.
- CPU Performance Defects - Certain processor models have confirmed hardware limitations (e.g., Intel's acknowledged stability issues with 13th/14th Gen 700-series and above CPUs).
- Inadequate Hardware Specifications - System components failing to the game's performance demands.
- Excessive Background Process Interference - Resource contention from non-essential background applications.
- Driver Issues - Outdated drivers may cause game crashes.
How to Fix Battlefield 6 Crash Issues?
It should first be noted that everyone's system configuration is different, so the cause of crashes may vary. The following methods may not work for everyone, and since EA has not provided an official explanation, we can only try them one by one.
In the official release version, we recommend focusing on points four and five.
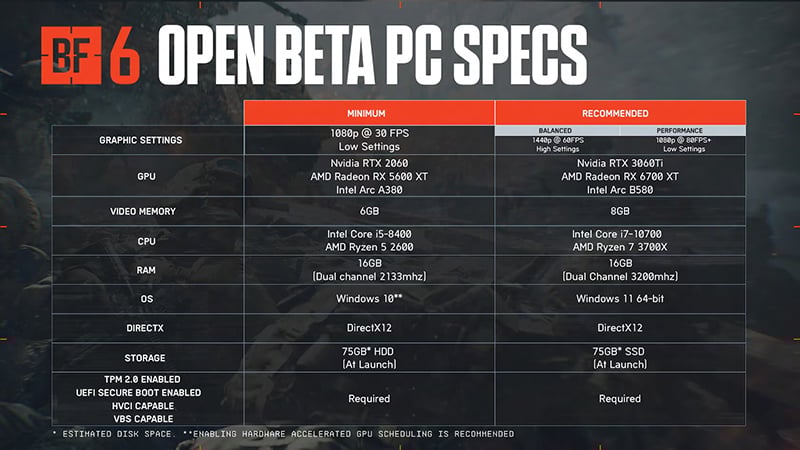
1. Check System Requirements
First, you need to confirm whether your PC configuration meets the official requirements. We recommend using the recommended specifications, as this ensures greater performance headroom and a smoother experience.
Critical: DirectX 12 is required for proper functionality.
2. Update Graphics Drivers
For NVIDIA Graphics Cards:
- Download the latest driver from NVIDIA's website.
- Run the installer and select "Express Installation" (recommended).
- Restart your PC after installation completes.
For AMD Graphics Cards:
- Download the latest driver from AMD's website.
- Run the installer and choose "Full Installation" (default option).
- Restart your PC to apply changes.
3. Increase Virtual Memory
During the beta test, memory leaks were observed, so increasing virtual memory can help mitigate crash issues.
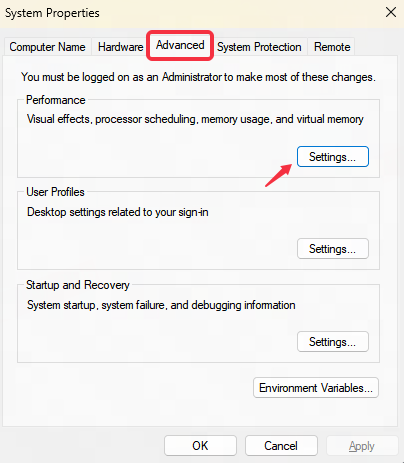
Open System Settings
- Press Win + R, type
sysdm.cpl, then press Enter.

Go to Advanced System Settings
- Click the "Advanced" tab → Under Performance, click "Settings...".
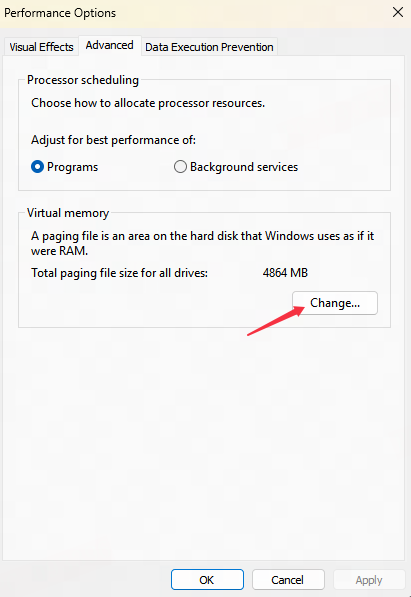
Open Virtual Memory Settings
- Go to the "Advanced" tab → Click "Change..." under Virtual Memory.
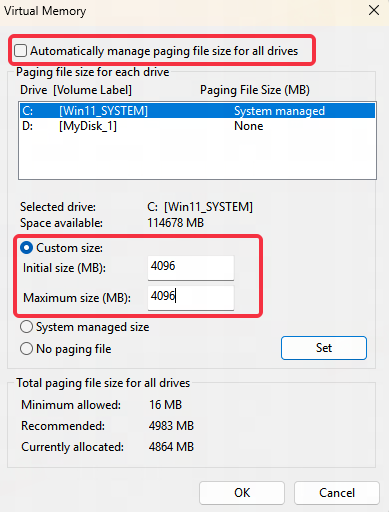
Set Custom Virtual Memory (Paging File)
- Uncheck "Automatically manage paging file size for all drives".
- Select your Windows drive (usually C:).
- Choose "Custom size" and enter:
- Initial size (MB): At least 4096 (for 4GB) or 5120 (for 5GB).
- Maximum size (MB): Same or higher value.
- Click "Set" → OK.
Restart Your PC
- Changes take effect after reboot.
4. Disable NVIDIA Frame Generation
As of the time of writing, NVIDIA's Frame Generation settings may cause Battlefield 6 to crash during startup or when loading into matches. You can follow these steps to disable Frame Generation:
- Go to the game settings interface
- Open Display Settings - Advanced Settings
- Locate NVIDIA Reflex Low Latency
- Turn it off
5. Reset Network
- Press the Win key + R to open the Run dialog box
- Type cmd, then press Shift + Ctrl + Enter to ensure it runs as administrator
- Then enter netsh winsock reset to reset the network
- Restart your computer to complete the process
If pressing Shift + Ctrl + Enter fails to run as administrator (which may occur on Windows 11), you can alternatively:
- Press the Win key
- Type cmd (Command Prompt) in the search bar at the top
- Right-click and select "Run as administrator"
- Follow the same steps above to reset the network
6. Reduce CPU Voltage (Risky)
This involves BIOS/UEFI settings and carries risks like system instability or crashes. Not recommended for beginners.
Enter BIOS/UEFI
- Restart PC → Press Del/F2/F12 (varies by motherboard) during boot.
Find Voltage Settings
- Look for "CPU VCore" or "CPU Voltage" (usually under Overclocking or Advanced CPU Settings).
Reduce Voltage
- Change from "Auto" to "Offset Mode" (or "Manual").
- Set an offset of "-0.1V" (e.g., if default is 1.3V → 1.2V).
Save & Exit
- Press F10 to save → Reboot.
7. Disable Memory Overclocking
For XMP (Intel/AMD) or DOCP (AMD) Profiles:
Enter BIOS/UEFI
- Restart PC → Press Del/F2/F12 (varies by motherboard) during boot.
Find XMP/DOCP Setting
- Navigate to "AI Tweaker" (ASUS), "OC Tweaker" (ASRock), or "Overclocking" (MSI/Gigabyte).
- Look for "XMP Profile" (Intel) or "DOCP" (AMD).
Disable XMP/DOCP
- Change from "Profile 1/2" to "Disabled".
Save & Exit
- Press F10 → Yes to save and reboot.
For Non-XMP Memory (Manual Overclocked RAM):
Enter BIOS/UEFI (same method as above).
Reset to Default
- Find "Load Optimized Defaults" (or similar) → Confirm.
- Or manually set:
- DRAM Frequency: Change to JEDEC standard (e.g., 2133/2400/2666MHz).
- DRAM Voltage: Set to 1.2V (DDR4) or 1.1V (DDR5).
Save & Exit (F10).
8. Close Background Applications
Open Task Manager
- Press Ctrl + Shift + Esc (or Ctrl + Alt + Del → Select Task Manager).
Identify & Close Unnecessary Apps
- Go to the "Processes" tab.
- Sort by "CPU" or "Memory" usage to find resource-heavy programs.
- Right-click unwanted apps → Select "End task".
Disable Startup Programs (Optional)
- Switch to the "Startup" tab.
- Right-click unnecessary apps → Choose "Disable" to stop auto-launching.
9. Run the Game in Windowed Mode
Running the game in windowed mode may reduce crashes. Adjust this setting in-game and maximize the window for a near-fullscreen experience. While this might be a temporary bug workaround, it's worth trying if other solutions fail.
Don't Ignore Battlefield 6's Network Issues
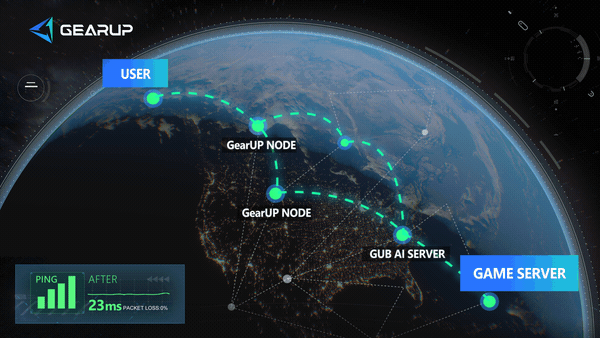
After resolving game crashes, high ping and latency issues in Battlefield 6 may still trouble you. You can use GearUP to address these connection anomalies. It employs intelligent multi-path routing technology, requiring no manual network configuration or ISP switching. GearUP automatically routes traffic through the optimal node in real-time, ensuring stable server connections and reducing in-game ping. Additionally, GearUP offers a Secure Boot check to quickly verify whether your system can run Battlefield 6 properly.


If you're a console player, you can also opt for GearUP's HYPEREV gaming router. It offers plug-and-play functionality—simply use the mobile app for one-click acceleration, making it ideal for living room console gaming scenarios. Best of all, it requires no PC to operate.
Click the purchase button below to visit the store page for more details.
Conclusion
In summary, due to differences in each player's situation, there is currently no definitive solution for Battlefield 6 crashes. The methods mentioned above require players to experiment based on their specific circumstances. We hope every player can enjoy a smooth gaming experience.
About The Author
Olivia Clarke, a community operations expert at GearUP, maintains deep communication with players through years of experience, allowing her to promptly gather player insights and feedback. She provides adjustments and suggestions for GearUP's product features. Additionally, she writes blogs to share existing issues in gaming networks and offers effective solutions to a wider audience of gamers.
The End